|
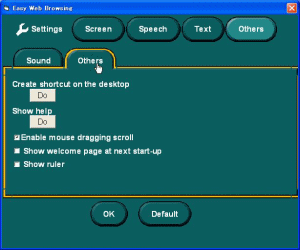
Create a shortcut on the Desktop
This setting determines whether a shortcut for Easy Web Browsing is created on the Desktop.
To create a shortcut, click Do, then click Yes. The shortcut appears as an Easy Web Browsing icon on the Windows Desktop. Double-click the icon to start Easy Web Browsing.
(Desktop: A screen that is displayed when no other program has been started after the startup of Windows.)
(Icon: A mark that is displayed on the Desktop. Each mark represents each program, and you can start up such program by double-clicking (clicking twice quickly) the respective icon. )
Show help
By pressing the "Do" button, you can at any time display the help page explaining how use Easy Web Browsing.
Enable mouse dragging scroll
When the checkbox for "Enable mouse dragging scroll" is checked, you can scroll a displayed page by dragging it with the mouse.
To drag a page, move the mouse to the margin of the page displayed, and move the mouse up are down, right and left, while keeping the left mouse button pressed. The page scrolls as if being dragged by the movement of the mouse.
You can disable this function by unchecking the checkbox.
The checkbox is checked when Easy Web Browsing is started for the first time.
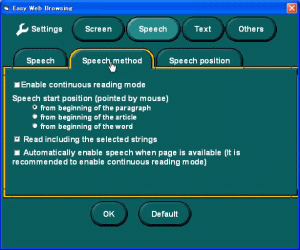
Show welcome page at next start-up
When the checkbox for "Show welcome page" is turned on, welcome page is displayed at next start-up.
When Easy Web Browsing is started for the first time, the check is turned off.
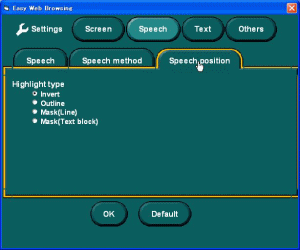
Show ruler
When the checkbox for "Show ruler" is turned on, magenta crosshairs or a crossbar that moves in synch with the mouse appear.
When Easy Web Browsing is started for the first time, the check is turned off.
|